Posted in Rou Bus

Rou Bus – Day 15: Grind day and night

I totally forgot to play Beyonce today. Shame on me!

Wendy got started around 8:00 this morning (I’m typing this Sunday night, but probably won’t publish until Monday- must proofread with a clear head). Today’s number one goal was to remove the walls under the windows. The walls are folded somehow under the windows so we would have to remove all of the windows to properly remove the walls. Not happening, friends. Most people just cut the walls right under the windows and call it a day. That’s more our speed. Wendy bought a fancy new tool to cut the walls. First, she used it to remove the last of the pesky bolts. Then, she removed the rubber and plywood from the floors.


I actually helped today! I used the drill to pull up some of the screws from the floor. I swept. I removed the stickers from around the emergency exit window until the sun was too much for me. Wendy started to sand the rust off the floor, causing me to suffocate under the mask. No worries; I’m still alive.

Wendy is always going to be the real MVP in this project. Always.

My dad helped us tremendously today! Turns out Wendy’s fancy new tool wasn’t quite fancy enough to cut through the walls. Dad’s super fancy tool worked, though. I think it was a more powerful grinder. Maybe by the end of this conversion I’ll know actual names for tools. Maybe I’ll remember to play Beyonce, too. Goals.

IMG_5102

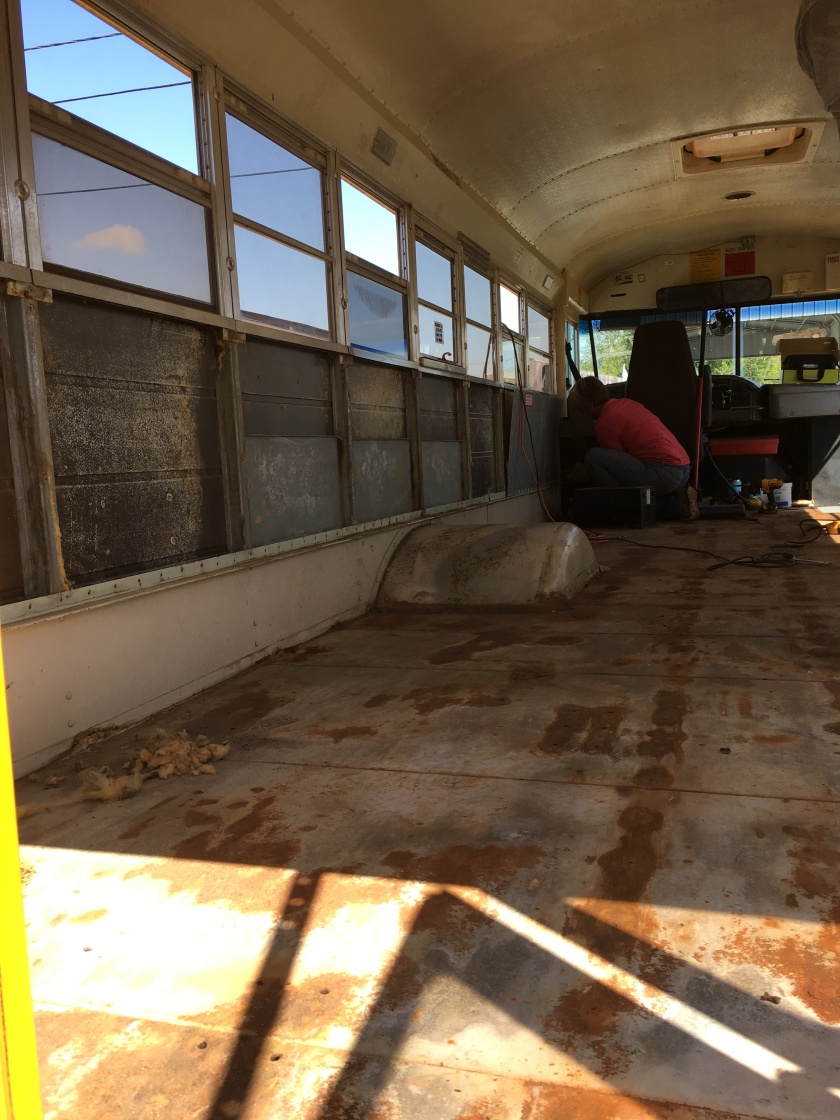
Check out that rust! It’s not horrible and it was expected. I’m not sure if buses, being giant metal boxes, naturally retain enough humidity inside to cause the rust, if water from the road seeps in through the bolts, or if drivers hose out the inside of the bus allowing water to seep under the rubber flooring.

Our friends Lanie and Alyssa stopped by during their Sunday bike ride! Hey, y’all!

IMG_5101

After the walls came out and Dad left, we took a lunch break. My grandma stopped by for a visit and brought us daiquiris. 🙂 Then back to work we went removing a million more screws. I felt super cool using the impact drill to remove the screws. We were able to take down the panels above the windows and remove the lights. They were just nicely plugged into the wires. That’s our kind of electrical work. We removed all the screws from the panel above the back door and about two rows of screws from the ceiling panels. That was about the time we both had to tap out. I’m deliriously tired.

I think we’ve accomplished quite a bit for only four days of work. I don’t think Wendy has any softball games next weekend so I’m sure we’ll get quite a bit done! Next up, we have to remove the ceiling panels and the panels above the windshield. We also have to treat the rust on the floor then figure out what we want to use for insulation.

Posted in Rou Bus

Rou Bus- Day 8: Demo all the things!

We’ve only had the bus for a week but it feels like so much longer. I’m pretty sure all of our conversations have been bus related. I still haven’t taken down the Mardi Gras decorations in the house. I’m still giddy every time I turn the corner and see the bus shining in all its yellow glory. Bus is life.

Last Sunday after we finished up removing the seats, we were working on the wheelchair lift. Those bolts have a dome-shaped top that you can’t grip. We found ourselves in the tool section at Walmart, likely looking dumbfounded trying to decide which tool we needed. A young guy walked down the aisle and asked if we needed help. We told him our dilemma and he pointed out a vice grip and mentioned that he’s a diesel mechanic. A WHAT?! We NEED a diesel mechanic! Oh yea, he works for International. You know what kind of bus we have? An International! Thank you, universe. And Oprah. (You know it was Oprah.) I immediately added him on Facebook.

Thanks to the world of Facebook marketplace, all of the seats and partitions were picked up on Tuesday by a very nice man from Bayou Blue. On Thursday, another very nice man impressively removed the wheelchair lift by himself and gave me some useful bus tips since he owns party buses.

Since Wendy is in the height of coaching softball, she can really only get work done on Sundays. So, today, our diesel mechanic, Daniel, came by to help remove the air conditioner. Remember that cloud of smoke driving home? Let’s not have that again. Buh-bye AC. Also remember that I’m not the muscles behind this operation so I cooked breakfast and lunch and went to the grocery store and used the razor blade to remove some of the stickers on the outside. So many stickers. A tedious and thankless task, but someone has to do it, right? 😉

After Daniel departed, we continued to work in the bus removing screws and flooring and again attempting to remove those pesky bolts with the dome-shaped tops. We eventually gave up and called my dad to borrow the grinder. Next week, we grind! Watch me play Beyonce while we work.

Next up will be more demo. All of the rubber flooring and nasty plywood, the walls and insulation, the ceiling. Basically anything that’s screwed down is coming off.

IMG_5022

Posted in Rou Bus

The Rou Bus! Day 1.

We bought a school bus!!

IMG_4928

All my peeps know that I’ve been obsessed interested in tiny houses for four or five years now. I abandoned the tiny house dream when Wendy and I decided to get married since she already had a house. We expected that we would buy a camper one day, so of course I started a Pinterest search for campers and came across some folks who renovated old campers and made them look super cute. I’m sure this is where I ran into pictures of old school buses converted into campers. I quickly concluded that a “skoolie” (as these conversions are called) would be perfect for us. We wouldn’t have to worry about buying a bigger truck with towing capabilities, the bus shell is built tough to keep kids safe, we could plan a layout that works best for us and 6 animals, and the inside looks just like a tiny house!

I don’t remember exactly, but I don’t think it took long for Wendy to get on board. She loves a project. We created a Rou Bus Pinterest Board to save ideas. We joined numerous Skoolie groups on Facebook. We researched (googled…) as much as we could about conversions. Now, we’ve been known to have many outlandish dreams that never come to fruition. With the skoolie dream, we knew we wanted to act now and not let this dream die. We set a budget (tax return…) and started looking online for used buses. We initially wanted a flat nose bus because you get more living space, but the rear engine buses don’t come in size medium. Hehe. We have limited space to park the bus, so 30 feet was our target size. We eventually decided on a conventional (dog nose) bus with 8 windows (the skoolie community usually measures buses by the number of windows on one side) and a handicap lift in the back (for an extra exit door). We moved our fence back and added more limestone to maximize parking space. I tried to spread the limestone with a shovel (I’m still sore) before Uncle Curt came to the rescue with a tractor. ♥

I spent a good two weeks trying to get the bus insured so we could immediately register it and be good to go for the drive home. That didn’t happen. Companies don’t want to insure a regular school bus for personal use because they don’t trust that you’ll do what you say you’ll do. Understandable. We read about many other people withholding information to get insurance, but that seems like a waste of money to me since any claims would likely be denied. We decided that we’ll just hope for the best on the drive home and get insurance once it’s converted. There are companies who will insure conversions, but they have to be somewhat completed first. Spoiler alert: we did make it home safely. 🙂

We looked at three school buses during our search and purchased the third one from the very sweet Wyatt Cambre, JR of www.cambrebus.com. We found his ad on Craigslist and set up an appointment immediately. We cannot recommend him enough! He was extremely helpful and answered all my text message questions. If you’re in or near South Louisiana and need a bus, go to his website and give him a call.

We took off to Covington to get ourselves a bus! My Nannie drives school buses and agreed to drive it home for us. ♥ I have the best aunts and uncles! It didn’t take us too long to get the paperwork completed at the title place and they registered the bus as a motor home, which should help when we try again to get insurance. Before we knew it, we were on the road home! Nannie and Wendy in the bus and me in the Fit following behind. We had just gotten onto the interstate when I saw some smoke under the bus. Before I could even think to call them, they were pulling over to the side. They said smoke was going into the bus through the dash board! EEK! I called Wyatt and he offered some suggestions. We decided to get back on the road and stop at the next exit, but after getting back on the road the smoke never returned so we kept on trucking. Wyatt checked back in on us twice, because he’s super nice like that. Later on we figured it may have been the broken AC compressor that I forgot to tell them about and they had turned on. Oops. My bad, y’all.

We got home a little after 2:00 and by 3:00 we were inside the bus working on taking out the seats. Waste no time, folks. So much for that nap… Wendy got to work on the first bolt when I told her that from what I read, one person needs to be under the bus holding the nut in place while the person in the bus turns the screw. Forgive my elementary terms here; I’m not a tools person. Y’all know my fibromyalgia self wasn’t about to lay down on limestone, so I threw Wendy under the bus (hahhahahahaa) and used my little muscles to use a socket wrench (I think) to loosen the screws. After a couple seats we found it was easier to loosen the screws with the wrench and then finish off with the drill. THEN my dad stopped by with big carpet squares for Wendy to sit/lay on and a super powerful drill (the name escapes me) that made all of this much easier. By 7:30, all of the bolts were out of the floor. There were 9 seats, 4 partitions, and about 12-14 wheelchair anchors.

Day 1 is done. Day 2 is underway. We have a TON of work ahead of us, but we’re ready for it. We expect this project to take at least a year. Rou Rags (I make shirts, y’all!) will be helping to fund this adventure.

I’ll update as often as I can and if you’re in town, please stop by!


Posted in rou rags

Crawfish Season- Batch 2

I’d like to start out with a huge THANK YOU to everyone who helped make Batch 1 a success!!! I can’t even begin to describe how awesome it feels to have everyone’s support. It was also the coolest thing ever to see my shirts on the parade route! YOU ALL ROCK!

So batch 2 wasn’t even going to be a thing until April. I already have the design drawn up for a fair-inspired shirt. But who wants to wait that long? And why stop the train now when it’s just getting started? Enter crawfish season.

The pic on the left was the original design that just didn’t feel right. I wasn’t a huge fan of the font and I won’t even tell you how many times I erased Mr. Crawfish’s legs and tail. I searched around for a font that was more exclamatory and my mom suggested adding the “y’all” and the pot. Thanks, Mom! The pot is actually my favorite part of the finished print on the shirts. lol

IMG_4539

I carved this design much faster than the first one. Progress! The first test print on paper was fabulous, mostly because when printing on paper you put the paper on top of the block and press down on the paper. When printing on shirts, it’s difficult to line up the shirt on top of the block, so I put the block down on top of the shirt and press down on the block. Of course, the middle of the block doesn’t imprint as well as the outside. Insert wonky-faced Mr. Crawfish.

I ended up scrapping six shirts because the face was unrecognizable. The print on the right is the best one. Most prints are somewhere in the middle. The good thing about scrapping six shirts was that I picked up a couple more 3x shirts when I re-ordered the six. I’m still learning about the best array of sizes. I did end up buying a .25 piece of foam in the craft section of Walmart and putting that under the shirt when I press down. It works so well!!

I was a bit discouraged by the prints not being perfect and had to remind myself that imperfect is kind of the aesthetic I’m going for here. I want my shirts to feel lived-in and comfy. Like your favorite old band t-shirt that’s kind of falling apart but it’s the most comfortable t-shirt that you own. That’s a lot to live up to. Maybe not EXACTLY like that shirt. Maybe like the newer version of that shirt.

I’m also trying to work on managing my social media. I originally created a FB page because those are really easy for people to find and they link up to Instagram. The problem with FB pages is that even when people like and follow a page, the page’s posts don’t always show up in followers’ feeds. I get a notification from FB Every. Day. asking me to boost my post. I shouldn’t have to pay for my followers to see my posts. For that reason, I created a FB group as well since posts in groups usually show up in the group members’ feeds. Now the problem is that I feel like I’m posting the same thing a billion times. It’s pretty easy to post to IG and FB page at the same time, but then I have to share that post to the group. I want my group to feel special, though. If you take the time to join my Rou Rags group, YOU ARE SPECIAL!

As an incentive for being a super special group member, I am going to release each batch to the group 24 hours before the general public. So group members have 24 hours to claim a shirt in their size. Since there are only 19 shirts available in this batch, claiming your size quickly is a big deal! And I’m dead set on keeping my word that when you buy a shirt from a batch, you are buying something truly limited edition. There are only going to be 23 of these shirts in existence (19 plus one for me, one for my wife, one for the model, and one for my mom).

If you want to be part of the super special Rou Rags VIP Rou Crew group, follow this link: https://www.facebook.com/groups/rourags

Lastly, THANKS AGAIN! for all the love and support. Making shirts has been so much fun!

–Sarah Roussel


Posted in rou rags

In the beginning…

I can’t even remember how it started. Probably like any other craft project or hobby that I get excited about- I saw something cool online and thought, “I could totally make that.” Then I buy all the materials and “totally make” whatever it is and then lose interest before making a second one. <insert half-completed weaving hanging on the wall>

So I must have seen a block print somewhere and thought, “I could totally make shirts with that!” I researched (Googled) everything about block printing, linocut, fabric ink, and t-shirts.

I didn’t jump right in, though. I wrote out a plan. I want to make hand-printed t-shirts. What kind? Definitely that idea that came about on a Facebook comment thread. My friends are pretty funny, so probably something funny that comes about organically. Probably designs that have to do with Thibodaux. I always have a song in my head so maybe some cool song lyric.

I decided I really wanted to focus on shirts related to Thibodaux and the surrounding areas, but then ended up carving out a play on a song lyric.  ? That’s my brain for ya.

So I created an image and printed it out and then used transfer paper to get it onto the linoleum block (in reverse image).

IMG_3815

I started carving and WOW that’s hard on the shoulder and elbow! It took me a bit to get the hang of it. I finished up carving and inked it up. A few test prints on paper led me to mounting the linoleum on a piece of wood. I was eager to try it out on a sample shirt and of course ended up with a wonky image. Patience is not my strongest suit.

I held off for a long time before attempting to print onto the rest of the shirts. I wasn’t completely satisfied with the cut. I ended up printing it onto the other two sample shirts and was still not happy (even though the image was centered!). I was starting to feel discouraged. I had another idea for a Mardi Gras themed shirt so I decided to whip out the second piece of linoleum and start over completely.

And how cute is this design? From the start it felt like it was going to work out AND it sticks with the Thibodaux theme. Win, right?

I hadn’t tried out the white ink yet so I started off with a print on black paper. So far so good.

These are all of the Mardi Gras Krewes in Thibodaux in the order that the parades roll. Maasai is a new krewe that was scheduled to roll last year but didn’t make it out for some reason. They’re still on the calendar for this year so I’m still including them. They’re rolling on Mardi Gras day after Krewe of Ghana.

So I was pumped to use the white ink on the shirts! Ha. Another fail.

IMG_4294

Hardly even visible. I’m using screen printing ink instead of block printing ink because it’s water-based and meant for fabric instead of paper. Most block printing ink is just for paper. There are other types of screen printing ink that would probably show up better, but this kind is water-based and not made of plastic. I’m sure this ink looks just fine using a screen. Well, needless to say at this point I was pretty aggravated. This is NOT a sample shirt. My fault for not testing out the white ink on fabric first. I was ready to give up, honestly, but then I said out loud to myself that the people who are successful get there by not giving up. Cheesy, but it worked. I had nothing to lose by trying to print the black ink on top of the white. Guess what? It looked pretty cool! Woot!

IMG_4298

Feeling overjoyed with the results, I finished up the rest of the first batch of shirts!

My vision for the future is to make batches of shirts. Once they’re gone, they’re gone. This keeps things exciting for me. This first batch is 18 shirts.

And what good shirts don’t have a brand name? Rou Rags sounded cute enough. 🙂 There’s a whole process of making tags and buying tagless shirts to be able to put your own brand tag in it. That’s complicated and costly for this little endeavor, so I just carved up the logo on linoleum and will put it on the bottom back of the shirts. Fits with the theme, eh?

I hope everyone enjoys this very first batch of shirts! Happy 12th night! And stay tuned for the next batch of shirts, probably coming out around April (aka festival season…).