Featured
Posted in Rou Bus, rou rags, Uncategorized

We’ve Moved!!

After some difficulties with creating a place for folks to pre-order shirts online, I ended up creating a whole new website that combines ecommerce and the blog. Continue following Rou Rags shirts and Rou Bus progress at https://www.rourags.com/ ! Our own domain name and everything!

We hope to see everyone on the new site! Thanks for your continued support!

Posted in Rou Bus

Rou Bus: Day 142- Moving right along

It doesn’t feel like much was accomplished in the last three weeks because the framing and cabinets going in felt so huge. Looking back at my pictures, we really did get many small things done.

First up, we learned how to drive the bus!! I posted some videos on IG and FB. I can’t post them on here since I’m not paying for a premium website yet. My nannie drives a school bus and so nicely imparted her wisdom to us. First, she drove us to the place where we were able to get a commercial inspection tag. That’s when we realized that the drawers were not secured (duh…) and the heater hoses were exposed and still had fluid in them. The fluid leaked all over the plywood and the bottom of the cabinets, but it all dried up just fine. Luckily, our cabinets are real wood instead of particle board. We went to the Nicholls campus and practiced turns and backing up. I drove us home and backed into the driveway with the extra two pairs of eyes helping me out. Our carport and fence are still standing, so it went well.

This is the screen we painted black and installed in place of a bottom drawer where the heater lives. I think it looks nice. See, no signs of a leak! Wendy did end up mounting the screens on the inside so it looks more finished.

IMG_1618

We’ve been picking up these wall panels whenever we have a Lowes coupon since we know we’re going to need them eventually. Wendy’s been itching to put some up so she started installing them where we know we won’t have to run electricity or plumbing. They look SO AWESOME! They are very thin and lightweight (super important) and they are reversible. One side is flat and the other has a beadboard look. We chose the flat side. They’re very pretty as is, but we’ll be painting everything white.

Wendy has made some more progress on the dash board storage area. We’ll have one shelf, a small glove box type cabinet, and one larger cabinet. The two doors for the larger cabinet are being repurposed from a microwave cabinet that Wendy’s dad built. Wendy turned the cabinet into a bar a while back and the doors were leftover. Now part of Wendy’s dad’s work will be in the bus! Again, our skilled friend, Jason, is routing them for us to match the other doors.

IMG_1819

The entry way got a nice face lift! Wendy put flooring down on the steps and put panels on the walls. I’m really loving the flooring.

IMG_1661

On one of our thousands of Lowes trips, I picked up some samples of white paint. I wanted whites that didn’t have any undertones besides maybe gray. There are tons of options to choose from so I started with a google search for the best white paints. I picked up a few of the recommendations plus other whites that looked similar. I started by painting on a strip of wood to see the colors side by side. Turns out, three of the whites were nearly indistinguishable from one another. My favorite two were Ultra White and Cool Gray (these are all Valspar, btw). The gray was noticeably grayish when next to the other whites, but alone it just looks white. I figured a white with a gray tone would maybe not look quite as BRIGHTWHITE! as the Ultra White. Cool Gray it is.

In the bus, the cool gray just looks like white, and I love it. It was recommended that we spray the cabinets because it’s easier and leaves a smoother finish. For me, the hassle of prepping the space and figuring out a sprayer was more of a headache than just painting the cabinets with a foam roller. The finish is smooth and it wasn’t at all difficult.

My nannie and grandma mentioned a small refrigerator they saw at Sam’s for $200. We looked it up online and it met our specifications so we immediately went to Sam’s to purchase it (there were only two left). It’s a standard apartment-size refrigerator that is not built to live in an RV, so says the paper. We’re not good at following directions. I’m assuming that it’s not meant for an RV because typically RV refrigerators have a gas power option and are built into the cabinetry. Our set up will be wired just like a house and the fridge will have plenty of room to breathe. I think it’ll be fine. For now it’s running in our back room to make sure it works. The cat swing makes for nice decor atop the fridge, no?

IMG_1654.JPG

We purchased an electrical panel, wiring, outlets, plugs, and storage boxes to prep for installing electricity. We are relying on the help of my uncle to install the storage boxes under the bus. They will house the electrical plug, extra wire for when plugging into shore power, and plumbing stuff. You know, that technical term for plumbing things… The hose that connects to shore water? I think that’s it. Now you all know my knowledge of technical terms is still non-existent.

Next up, Wendy will continue working on some small projects inside, I’ll help paint, and the storage boxes will be installed. Volleyball season is starting up so Wendy won’t have as much free time. I imagine it will be slow going for a while, but then again, we’ve gotten so much further than I anticipated when we started.

Oh! These are the paint colors I’m considering for the exterior. Gray on the bottom, blue/green under the windows, and white on top.

IMG_1646


Posted in Rou Bus

Rou Bus- Day 121: Framing and Cabinets and Rebuilding, Oh My!

I can’t believe so much was accomplished in just a week! And I actually helped, in the heat, this time and there’s photographic evidence. What.

I don’t recall sharing the specific type of flooring we decided on. We got these vinyl planks from Surplus Warehouse and as I link to it I’m seeing that it has a cheaper price online… not cool. We were debating between a gray wood and a warm wood look. Eventually warm wood won because our counter tops are going to be stained and sealed wood and I think this flooring will match them nicely. As much as I love a gray and white look, the bus space is so small that I don’t want it to end up looking too cold.

IMG_1426

On to the progress! Wendy put up the framing for the toilet room and the closet. I learned how to drill pocket holes with the kreg and now consider myself a master of the pocket holes. I can’t even tell you how many I’ve drilled.

This is the tiny toilet room! We’re going to put a small shelf or cabinet above the window to hold the essentials. We’re getting a composting toilet, probably the Nature’s Head.

IMG_1404

The closet is a nice size- 4.5 feet wide, 2 feet deep, and ceiling height. The bottom left quarter of the closet will be completely closed off to house the litter box. Instead of using a tape measure, we just lugged the whole litter box out to the bus to make sure it would fit. Quite proud of myself for putting up those wall slats! Don’t they look fabulous?! And all those expertly-drilled pocket holes. If school psychology doesn’t work out I may have a future in construction. hahahahahaaaaa  I also put the wood slats on the bottom front of the closet. We’re looking at these accordion doors for the front of the closet. The right side will have a full door and the left side will have the door just above the litter box area. The litter box will have it’s own wooden door with a cat door in it.

Looking pretty awesome so far!

IMG_1408

We had planned to build the sofa next until Wendy realized that we wouldn’t be able to get the kitchen cabinets in the bus with a whole sofa already in there. We decided to move the refrigerator to the other side of the kitchen (next to the toilet room) so that we could have a taller fridge. There’s a heater behind the driver’s seat that the fridge would have had to sit on top of. It’s easier to put a cabinet of some sort on the heater. We figured how many inches we had to work with (5 feet plus 30 inches where the heater is) and set out to price unfinished cabinets at Surplus Warehouse and Home Depot. Surplus Warehouse had the exact measurements we needed and a bonus cabinet that we can use next to the sofa and the stairs. Our original plan was for Wendy to build a cabinet next to the sofa until we found a perfect one. Home Depot didn’t have quite the selection that Surplus Warehouse had, so we trekked back to Schriever and bought some cabinets!

I’m going to have a full 90 inches of kitchen counters in the bus including the sink. The sink will be under-mounted and a piece of wood to match the counters will be fitted on top so the sink can also function as counter space. This is more counter space than our house, y’all. I’m so pumped.

Wendy had to cut part of the cabinet to allow the hoses to reach the heater. The bottom drawer was removed and we’re going to put a decorative screen in its place to allow the air to circulate. Since the heater blows out air almost on the ground level, Wendy cut a hole in the kick plate and will put a screen down there as well. We had some leftover screen from the bar Wendy built in our house. It got a nice coat of black spray paint and will also be used to cover a small vent hole in the ceiling. You can see it sitting on top of the cabinets in that first picture above.

The cute little cabinet that will fit between the sofa and the stairs got a little upgrade. It’s actually an upper cabinet that just so happened to be the perfect size and layout for what I imagined. I put two little pieces of wood in the bottom opening to turn it into a shoe rack. We should be able to fit two pairs of sneakers and several pairs of flip flops in there. I’d like to put a little piece of vinyl flooring on the bottom to keep it clean. I just love that it worked out perfectly!

Wendy finally came around to the idea that the bed needs to be higher to allow for more storage under the bed. The fresh water tanks that we’ve been looking at are usually taller than 12 inches. We pulled out the current framing, picked up some better plywood (not about that mdf), and worked on building a 20 inch high bed frame. I had originally wanted a couple of drawers under the bed and now we have an extra drawer from the kitchen, so we made that happen. Our amazing friend, Jason, who helped Wendy get the cabinets from the truck and into the bus, is going to try to help us rout some plywood to create two smaller drawers to match the big one. So now we have a bigger bed frame with openings for three drawers. Still waiting on the lift kit for the bed, btw.

Also pictured above: proof that I helped and even used power tools! I may have said, “This is too vibratey” after using that saw for ten seconds. My body is very sensitive to pressure.

When we first started looking for a bus, we wanted to get the maximum amount of space within the 30 feet we allowed ourselves for a bus (because of parking space). We were considering a flat-nose bus, but those come with their own downfalls such as engine placement and difficulty to service. When we settled on a dog-nose bus and I had to drop my layout sketches down by ten feet, I was really worried that our bus would be so cramped and tiny. I have been amazed at how much we are able to squeeze into our 19ft by 7.5ft of living space. We have a queen size actual bed (not a fold out sofa or other type of convertible bed), a 24″ by 38″ bathtub, a toilet room, a 4.5ft closet, a 6ft sofa that will pull out into a second bed, a 12″ cabinet next to the sofa, a 7ish cu ft refrigerator, and 90 inches of kitchen counters/cabinets. I don’t feel like we’ve had to settle for anything less than what we really wanted. Honestly, I feel like we’re getting more than I expected!

Next up, we’re going to put up some of the wall paneling in places that we know won’t have wiring or plumbing and will start on building that sofa. We ran into one of Wendy’s friends who offered to help us with electrical who knows what he’s doing and is an avid camper. We’ve been so lucky with the help we are receiving and we are beyond grateful!

IMG_1528


Posted in Rou Bus

Rou Bus- Day 115: It’s starting to look like a camper!

Wendy has made so much progress in the last couple of weeks. Throwing up framing really brings it all to life. It’s so exciting!

After putting in the sub floor and insulation, she insulated and boxed in the wheel wells. When reading the instructions on the box of vinyl flooring, we realized framing on top of the floors was not recommended. We shoved the boxes of flooring under the spare bed in the house for safe keeping. đŸ™‚

Wendy then put framing on the walls and furring strips on the ceiling. Instead of buying furring strips, she cut strips from a piece of thin plywood.

Pro tip: write down measurements on literally any surface. I have no idea what these mean and I’m not sure Wendy remembers what they mean either. đŸ™‚

In the front of the bus, Wendy put up a piece of wood under the spot above the windshield. It looks much nicer than just the black metal. Eventually we’ll make the whole space into cabinets and mount a small television (also to be used as a back up camera) and probably a stereo with speakers. The space under the dash by the door will also be a cabinet. Storage everywhere we can squeeze it!

Now for the really fun part- framing! In order to make sure the framing measurements were correct, we went ahead and purchased the metal bed frame with lift kit and bathtub. The metal bed frame arrived without the lift kit and we’re still trying to rectify that situation. Wendy was able to use the instructions on the bed frame website to build the wood frame for under-bed storage.

IMG_1384.JPG

Since the bathtub is going to be next to the bed, Wendy framed up the bathtub walls next. We changed up the floor plan a bit to give us more space. We were going to put the bathtub in and just leave a small opening by the toilet to get in and out of the tub. The opening was tiny- maybe 8-10 inches. Not going to happen! We decided to put the bathtub by itself and then enclose the toilet in it’s own tiny room with an accordion-style door. This works out well and actually gives us a bit more room. We had also initially planned to just have a shower pan in the 24″ by 38″ space. I was searching the internet for a shower pan and came across tiny RV bathtubs with those exact dimensions! It’s not quite big enough to really relax in, but it will make bathing dogs on the road so much easier. And it’s super cute.

It’s looking like a camper now!! Across from the tub and toilet room is the closet and litter box storage. Wendy framed up one of the closet walls so I was able to walk through and really get a feel for how much walking space we have. I am surprised and relieved that the whole back area feels quite spacious. There’s a little space behind the closet across from the tub that we can easily get dressed in. I’m planning to hang some curtains to block off the tub area and/or the whole toilet/tub/closet area for privacy from the front of the bus. The curtains can also keep the cool air-conditioned air in the bedroom at night since the mini split will be mounted on the back wall above the bed.

IMG_1379

Next up will be framing the closet and the toilet room and building the sofa. We’re still anxious about plumbing and electrical. We’ve consulted with many friends and our heads are still swimming a bit. Once we get past electrical and plumbing we’ll feel much better.

Neil hasn’t jumped the fence to the front yard in a very long time, but decided to come check out our progress the other day! I think he’s going to enjoy traveling.

IMG_1382

Posted in Rou Bus

Rou Bus- Day 98: Insulation and subfloor

I was reading through the last post to see where we left off and I had pictures of Catsy laying under the bus. Not too long after that post, our beautiful Catsy girl was killed by a car. Our sweet girl loved to explore. It was traumatic and heartbreaking and we miss her dearly. She would have loved traveling in the bus. RIP Catsy Cline

We last left off with a few leaks and some locks on the doors. Just when we had thought all the leaks were gone, more would pop up. There’s still one lingering leak at the bottom of the side door, but it’s being managed. I don’t know exactly what Wendy did, but I know she caulked and sprayed and sealed so much that we may not have to even paint the bus. hehe

Once the leaks were truly under control, Wendy started measuring out insulation and 3/4″ plywood for the subfloor. The insulation is the hard blue foam kind that is sturdier to hold up under flooring. We were able to walk on it without crushing it. I think we only needed about 4 sheets of it. We used liquid nails to attach it to the floor and then to attach the plywood on top. Some sections of plywood were warped so Wendy ended up screwing those sections down.

Once the floor was down, we picked up some more insulation for the walls and ceiling. We chose the white 3/4″ foam sheets that have foil on one side and are not as sturdy as the blue sheets. Wendy measured out all the little pieces and I cut them and squeezed them into the wall and ceiling sections. The metal ribs of the bus have lips on them so the foam pieces were easily bent to pop into each section. We didn’t even bother using liquid nails since they stay in place on their own and will have wall and ceiling panels on top of them.

Wendy just finished cutting plywood to fit over the steps and is now at Lowes picking up materials to box in the wheel wells. We’ve decided to put in the vinyl plank flooring before framing out the bathroom and closet walls. It won’t be much longer until we start figuring out electrical. We have a very lovely friend who offered to help us out with that.

We’re still moving along slowly. It’s hard for me to be in the bus in this Louisiana summer heat. It’s a good thing Wendy is built tough!

Posted in rou rags

Rou Rags: Baby, you’re a firework (Batch 4)

Helloooooo, good people! It’s been a minute since I wrote a blog. It feels like forever since releasing the Fair shirts, but it’s only been two months. Even progress on the bus has been slow since then, but I’ll have an update on that soon! Huge thanks to everyone who bought a fair shirt!

Before getting to the 4th of July shirts, I want to share a quick little print I did for myself and two other school psychologist friends. The school I work in had a superhero theme this year and we were allowed to wear superhero shirts one Friday. So, in true Sarah fashion, I decide the night before to make a shirt. I drew up a simple superman design, carved my booty off, and printed three shirts. I love how they turned out!

IMG_5430

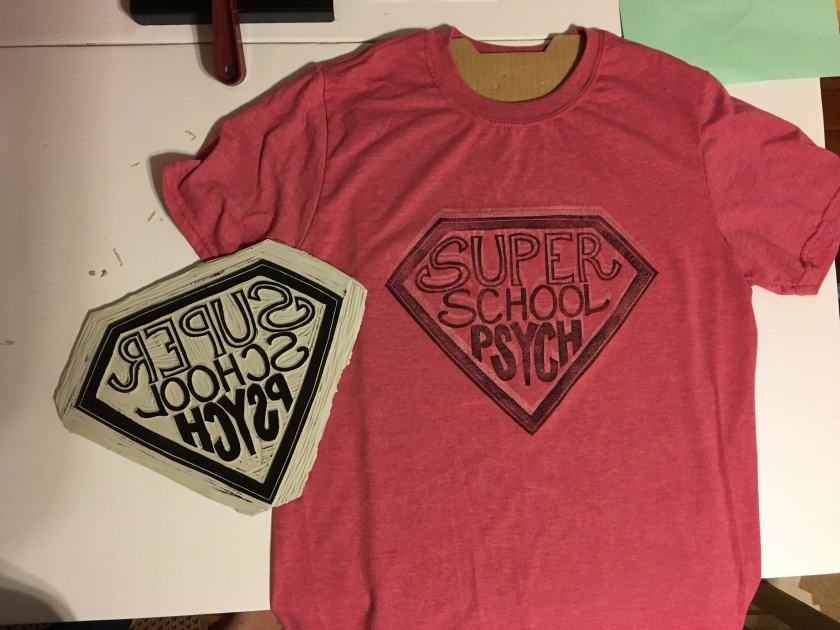
Also, I used the back of the fair shirt rubber block to make this design. I’m serious when I say these shirts are limited!

IMG_5426

Now, onto the Batch 4 shirts!!

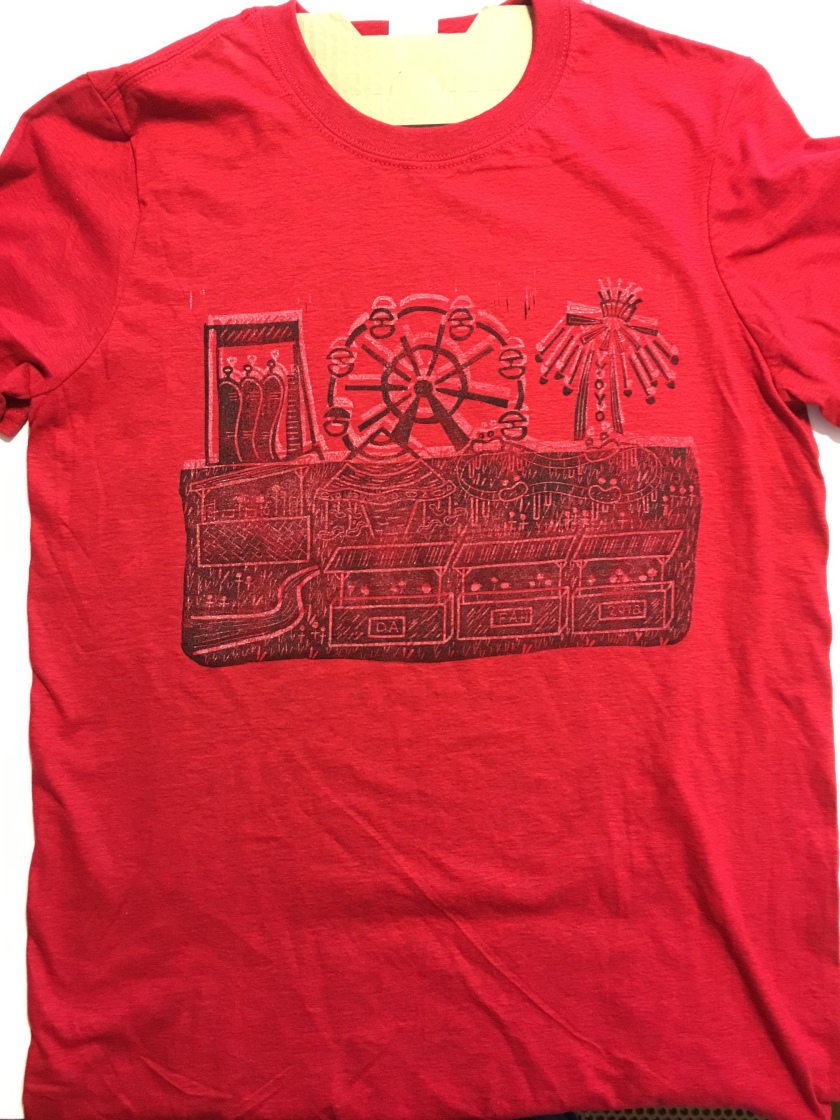
I knew I had to design a 4th of July shirt because it’s such an iconic holiday with all the red, white, and blue. I had the idea for the specific design a long time ago. I think I drew it around the same time as the crawfish shirts. Using red, white, and blue was always in the plans, I just wasn’t sure how. At some point, I figured I would use a color for the background. I don’t know how I come up with this stuff, y’all. It just hits me. I’m not the greatest at coming up with ideas on demand- it has to just come to me.

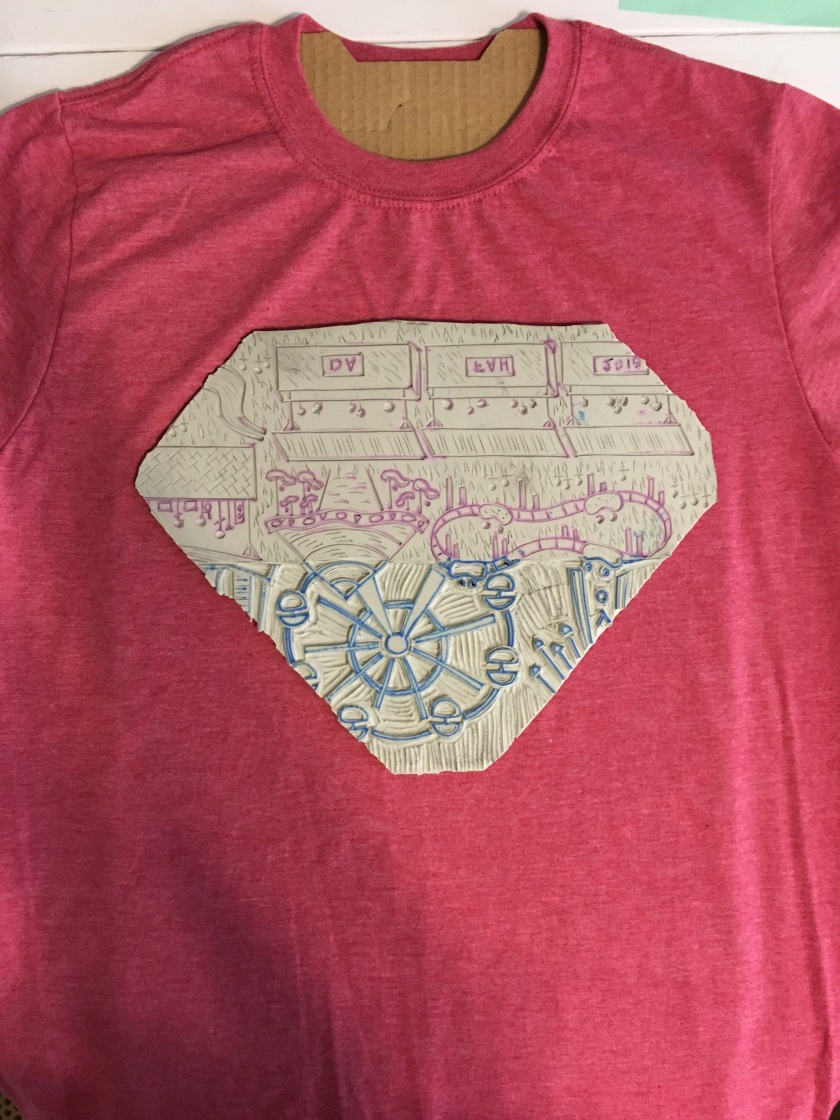
In Thibodaux, the fireworks on July 4th are set off near Nicholls State University’s stadium. That’s the building in the design. A very rough likeness. lol Fun fact: Nicholls is where I earned both of my degrees, neither having anything to do with art.

The drawing started with the details, of course. Then I decided to make large, simple figures for the background. I drew them on top of the detailed drawing to make sure they would line up, then I transferred the drawings to the front and back of a rubber block.

Many print makers that I follow on social media mix their own ink colors and use multiple colors on one brayer (roller). I had initially planned to use one brayer for each background color until seeing the way they blended colors.

My first test print with the background colors worked exactly as I had imagined! Now, you would think I would have test-printed the details on paper next, but nooooooo. I don’t consider myself a risk-taker, but here I am, taking risks. I printed the background on all of the shirts first! Sarah Danger Roussel, at your service. (Boy, I really wasn’t thinking hard enough when I changed my name to Sarah Knight Roussel, was I?)

IMG_0982

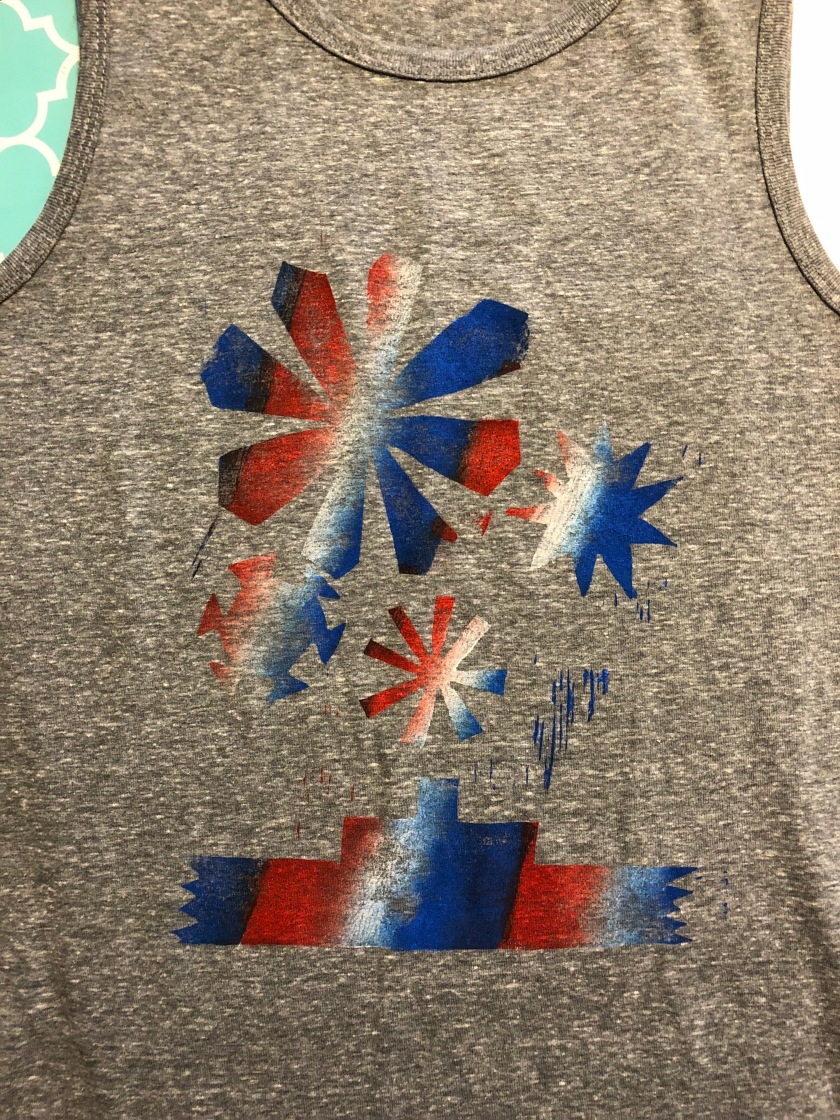
So after printing the background on all the shirts, I finally test-printed the details on paper. Y’ALL. I cried. I knew what I had envisioned, but rarely does the end result actually look exactly like what’s in my head. The first print on a shirt was even better. I still can’t believe they turned out this well.

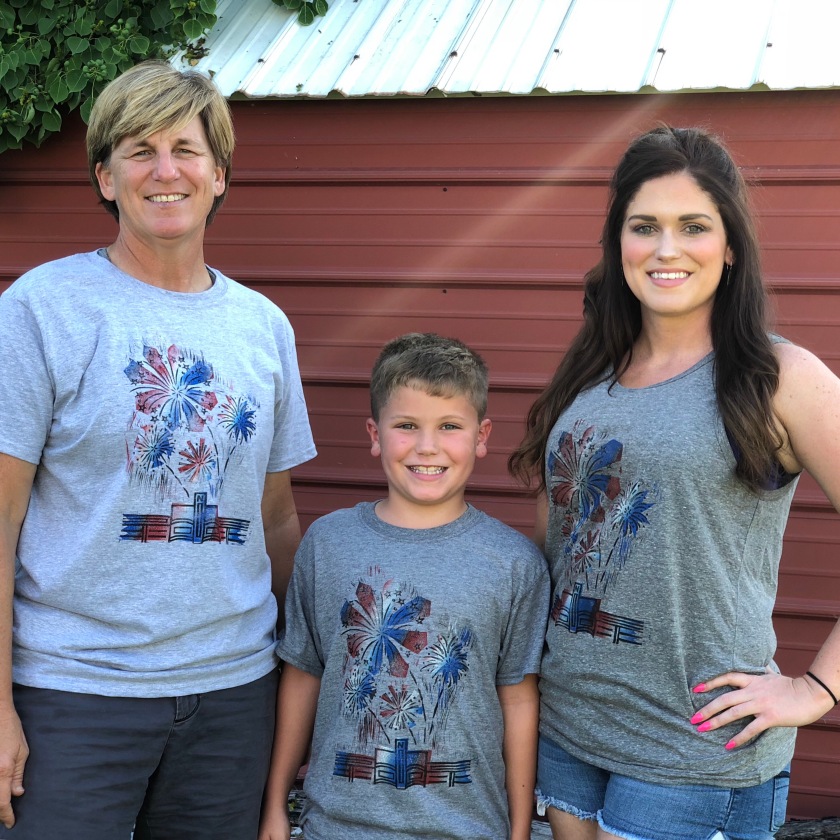
I’m venturing out with different shirt styles this time. Initially, I was only going to print on tank tops because this is South Louisiana and we were already seeing 90+ degree days in May. A few people expressed interest in t-shirts over tank tops (even in the sweltering heat), so I ordered t-shirts as well. And because I always have to be extra, I got a few youth sizes, too.

Look at this fine trio! My wife, my godchild, and his mom!

IMG_0978

The shirts will be on sale Sunday 6/10 at 8:00 a.m. in the Rou Rags VIP Rou Crew. I’ll post in there with the sizes available and you just have to leave a comment with the size you want. There are only 32 shirts for sale (a combination of tees, tanks, and youth tees), so this design is very limited! Set your alarm!

I do have some good news coming this summer that will hopefully improve the shirt-claiming experience and will guarantee that you get the size you want. Stay tuned!

Posted in Rou Bus

Rou Bus- Day 56: a quick update

Happy Cinco de Mayo!

It’s been quiet on the home front around here. I searched through my phone for pictures to post and I only had two. *gasp* I will run outside and take a few pics before I finish typing so this quick update doesn’t turn into a boring quick update.

All of the doors have locks on them now. These may or may not be the final locks when we hit the road, but they’ll work for now to keep our progress inside safer. We also plan on getting some outdoor cameras.


The major battle Wendy has been fighting (because, honestly, I took no part in this except to wield a water hose) has been against window and door leaks. Buses are not water-tight. Who knew? We knew, we just weren’t quite prepared for how difficult it would be to seal things up. Where are all the holes? We can’t even see them!

Wendy resealed all the windows and spots near the doors and sprayed the bus down with the hose. It still leaked. She sealed again- fewer leaks. I think she’s finally down to one leak.

IMG_5230
Wendy sealing the roof seams

Once we can keep the water out, the subfloor can go down and the walls can be framed. Then we’ll need to figure out electrical which is seriously overwhelming. If anyone has electrical experience or knows someone who does, hit me up! We need all of the consultation and help we can get. We’re still trying to figure out which power sources we should use for which appliances. We’d like to be able to use shore power AND go off grid for short periods of time. We’ve got to be complicated.

Catsy loves to lay under the bus. I can’t wait to take them on a trip and see them all freak out. đŸ™‚


And just because Wendy can never have enough projects, she created a new patio area in the back yard and built a sofa out of cinder blocks and 4x4s and a table out of pallet wood. Handy, that wife.

IMG_5537

Posted in rou rags

Rou Rags: It’s fair and festival season!

April and May in Louisiana is the best time of the year. Hands down. The weather is anywhere from freezing cold to blistering hot. Take this weekend: Friday was beautiful, Saturday was a hurricane, and Sunday morning was in the 40’s. April and May also bring us alllllll the fairs and festivals imaginable. I counted 33 different events on the Louisiana Association of Fairs and Festivals website. Louisianans LOVE to party, y’all.

In Thibodaux, one of the main events this time of year is the Thibodaux Firemen’s Fair. The four-day celebration that started in 1883 raises money for our volunteer fire departments. There’s a steady stream of bands playing on the stage, food and drinks all around, and a variety of rides and games in the back field. I’m certain I’ve been to the fair every year that I’ve lived in Louisiana. Enjoy these gems from 1986. Tiny Sarah, my mom (in white) and my aunt Cheryl (in stripes).

I’ve had this design drawn for a while now. It’s what I see in my mind when I envision the fair. Again, the first step of transferring onto the soft-kut block was… a process. lol I tried to press really hard on the paper with Sharpie pens. That gave me a faint outline that I was able to draw over to make it visible. I knew I wanted to try to carve a contrasting design. The top part in blue will end up having a transparent background and the purple part will have a black (ink) background. It’s hard to explain, but I could see it in my mind!

This design is much more detailed than the last few, but really didn’t take very long to carve. (Thanks, Soft-Kut blocks!) The grass details on the bottom were really fun to carve and resulted in the tiniest little rubber pieces.

You really never know exactly how the details will show up until the first inking and the test print. The white and black inkings on this design are so pretty! If only they showed up that clearly on the shirts, eh?

This shirt is definitely all in the details! This is a “look closely or you’ll miss it” design. This is a “Sarah made a mistake carving this- can you find it?” design. Seriously. I didn’t even catch it until half way through printing the shirts! The first person to catch it gets a free Rou Rags logo tee. Send me a message or text or email if you think you found it.

IMG_5186

The gorgeous Daralyn was my model for this batch! We had lots of fun making cotton candy and indulging the pups.

These fair shirts will be available on Saturday, 4/21/18, at 8:00 am only in the Rou Rags VIP Rou Crew Facebook group! There are only 16 shirts available. I’ll post the sizes and you can claim your size in the comments. The general public will be able to claim shirts on Sunday. GO JOIN THE GROUP! I promise you won’t get spammed in there mostly because I forget to post things in the group. Oops. That’s what Instagram and the Facebook Page are for. đŸ˜‰


Posted in Rou Bus

Rou Bus – Day 28: Done with subtraction

Last week we finished up the demo. Daniel the diesel mechanic came by and helped Wendy remove the heater and the last of the ceiling and wall panels. The heater will be re-installed later, but for now it was just in the way.

Since we plan on turning the bus doors into one typically-functioning door, Wendy removed the plastic covering the door-opening mechanism (killing it with the technical terms still…). We found empty soda cans. How? Why?

Not gonna lie- I didn’t actually do anything on the bus this time. I cooked instead. Once everything was out, the floor needed to be treated for rust spots. Wendy bought some Corroseal and Rustoleum online. The first step was to roll on the Corroseal (two coats). The Corroseal turned the rust black. Then she filled in the holes from the seats with silicone and pieces of mesh. The Rustoleum came next and made the floor look pretty nice!

During the week, we were able to finally get insurance! Once I was able to show them it was titled as a motor home and that the seats were removed, we were quickly given a policy. It ended up being even cheaper than the initial quote. Score! With insurance in hand, we were able to get a license plate!!

IMG_5172

With the floors ready to go, the next step is to frame up the floors, walls, and ceiling and fill in with insulation. In order to know where we need to have studs in the floors for the walls, we put down tape to check our layout. This gave us a more realistic feel for how much room we will (or won’t!) have. It prompted a good discussion about the bathroom and what we truly need. We ended up nixing the tiny bathroom sink altogether to have more kitchen space. We would really only use that sink to brush our teeth or wash our hands, which we can do in the shower or the kitchen sink. I’ll be sure to have some fancy hand sanitizer in there.

The second picture below is the preliminary floor plan. The toilet section will move closer to the shower to give us another two feet or so of kitchen space. We’re also planning for storage space under the bed and under the sofa. The sofa will also convert into a small bed.

I guess this is where King Neil thinks he’s going to be riding…

IMG_5218

It’ll probably be quiet for a while. We’ll definitely be able to get some studs and insulation in, but we have to do a lot more planning for electrical and plumbing. We also need to find someone to help us with the electrical. I have a feeling that’s going to be a big job!

Posted in rou rags

Rou Rags: Logos and special-tees

It’s been a good minute since I’ve posted about shirts! We’ve been quite taken with working on the bus, but I’ve still been busy creating.

First up, I made some logo tees! I’m so in love with the soft-kut rubber blocks. My elbows aren’t sore anymore and they clean up so nicely. I can wash with soap and water and not worry about warping the wood block.


I gave logo tees to everyone who bought shirts from both of the first two batches. The real VIPs! đŸ™‚ I’m so grateful to everyone, really. Logo tees will also be for sale whenever I order shirts for batches. I’ll give everyone a head’s up. You get to choose your shirt color and black, white, or combination ink. Also, Zuri was a big help.

What’s the super special secret project I was working on??

I do believe it was the very first day that I posted my Thibodaux Parade Krewes tee that Klint sent me a message. He loved the look of the accidental shadow text (black text with white shadow) and wanted shirts with his logo on them. Klint is a fantastic photographer who is responsible for our unbelievable family pic as well as the pictures from our wedding reception. Check out his work here and below.

I knew I wasn’t ready at the time to do any kind of commissioned work, so I waited until after Mardi Gras season to get started. His logo includes some extremely tiny letters which prompted me to find a super small carving tool. Of course, the one I chose had to be shipped overseas and took about three weeks to arrive.

I hit another roadblock with the soft-kut blocks- they don’t take transfer paper well at all. I ended up having to free hand this very precise logo. At first I was somewhat put-off by the look of it. I had to remind myself that if he’d wanted a pristine logo, he would have just ordered shirts online. These are handmade shirts that don’t all look exactly the same. It’s been interesting having to challenge my tendencies to want things to be perfect, especially things that people are paying for!

Klint’s project was also fun because he requested a couple of kid-sized shirts. The whole logo was too big for such small shirts, so I just inked up the K part of the logo. These ended up being my favorite! Tiny things are so precious.

As a bonus, I printed Klint’s logo on a grocery tote! I couldn’t help but grab some of these grocery totes to print my Rou Rags logo on. Instead of wrapping his shirts in paper as I usually do, I put them in a personalized bag. Love it. Note: DO NOT iron these bags! haha whoopsie

I am currently working on the next batch of shirts which should be out within the next couple of weeks- just in time for festival season!